

JS runtime for headless JS tasks and services
Headless JS tasks and services utilize Vega App Components in the background. App components add a secondary JS runtime (powered by Hermes) on top to enable JS code execution and allow you to listen to lifecycle events from your code. Each instance of a headless JS task and service has its own JavaScript runtime instance.Supported modules in headless JS context
To maintain a small memory footprint, the headless runtime is a simplified version of the available user interface and supports only the modules listed in the following table.Supported React Native libraries in headless JS context
Since the headless JS runtime supports limited modules, it only supports a limited set of React Native libraries, listed in the following table.Using unsupported modules
Using any module or library not listed above results in runtime errors, like the following example. This error complains about theDeviceInfo module that isn’t available in headless JS context.
E Volta:[KeplerScript-JavaScript] Invariant Violation: TurboModuleRegistry.getEnforcing(...): 'DeviceInfo' could not be found. Verify that a module by this name is registered in the native binary., js engine: hermes.
This error can appear even when you don’t directly import the problematic module.
The error happens when:
- You use a module that imports the problematic module
- You try to use an unsupported library
- You import a module incorrectly
@amazon-devices/react-native-w3cmedia directly instead of using its headless export when writing code for headless JS, you’ll see this error.
@amazon-devices/react-native-w3cmedia only includes modules that work safely in headless JS. If you skip this export, your code will try to load UI-related modules that depend on unsupported features like DeviceInfo from @amazon-devices/react-native-kepler, causing errors.
While we plan to add tools that detect unsupported modules during build time, for now, make sure you only use modules that Vega has approved for headless JavaScript.
Build headless JS tasks and services
To register your headless JS tasks and services, you need to do the following:Step 1: Advertise your components in app’s manifest (manifest.toml)
Variations in manifest files
Different headless JS tasks and services need different settings in manifest.toml file. For example:- EPG Sync Task uses
"runtime-module = /com.amazon.kepler.headless.runtime.loader_2@IKeplerScript_2_0" - Headless JS playback uses
"runtime-module = /com.amazon.kepler.keplerscript.runtime.loader_2@IKeplerScript_2_0"
- Headless JS playback runs in the same process as your UI
- EPG Sync Tasks run in a separate process
Step 2: Register entry points
To register entry points for tasks (using thedoTask function) and services (using the onStartService and onStopService functions), we recommend that you create two separate files: task.js and service.js. Place the files alongside index.js, which registers the entry point for the UI using AppRegistry.registerComponent. You can use task.js and service.js files to register entry points for multiple headless JS tasks and services.
- task.js for headless tasks
- service.js for headless services
- task.hermes.bundle for tasks
- service.hermes.bundle for services
react-native build-vega, you’ll need to manually:
- Generate Hermes bytecode bundles from your entry point files (
task.jsandservice.js) - Add these bundles to your app package (VPKG) yourself
Debug headless JS tasks and services
Logging
To debug your code in headless JS tasks/services, you can use console logs (console.log) and see them in device Logs
Run the following command from your device or simulator shell:
Quick JS bundle updates without rebuild
Headless JS tasks and services can now fetch the updated JS bundle without having to rebuild and reinstall the app. Headless JS tasks and services don’t support Hot Reload or Fast Refresh, which allows changes to be visible without relaunching. Instead, you need to relaunch headless JS tasks and services to pull the updated JS bundle. To use this feature, follow the steps below.- Build your app (UI and headless JS components) in debug mode. Note: Line-by-line debugging, as with UI components, doesn’t work with release builds.
- Install the app.
-
Run the Metro server (
npm start) from the project root. -
Set up reverse port forwarding from your device (
target) to your development machine (host) for the port that the app and Metro are configured to use (typically8081). Without this step, the app can’t connect to the Metro server. - Launch the app. You should see that all JS bundles (both UI and Headless JS) are now served by Metro.
Line-by-line Debugging
You can debug headless JS tasks and services line-by-line, but with some limitations:- Only works with Vega Studio’s Dev Tools
- Dev Tools only shows the most recently launched JS component
- Both UI and service run together
- The service launches last, so Dev Tools shows service.bundle
- To debug the UI instead, you must:
- Launch the headless service first using
- Then launch the UI component
- Dev Tools now shows index.bundle
- Build your app (UI and headless JS components) in debug mode. Note: Line-by-line debugging, as with UI components, doesn’t work with release builds.
- Install the app.
-
Run the Metro server (
npm start) from the project root. -
Set up reverse port forwarding from your device (
target) to your development machine (host) for port 8081 (or the port configured for your app and Metro). Without this step, the app can’t connect to the Metro server and interact with the Dev Tools. -
Launch the Headless JS task or service that you want to debug.
- Manually launch with this command: .
- Launch the UI component.
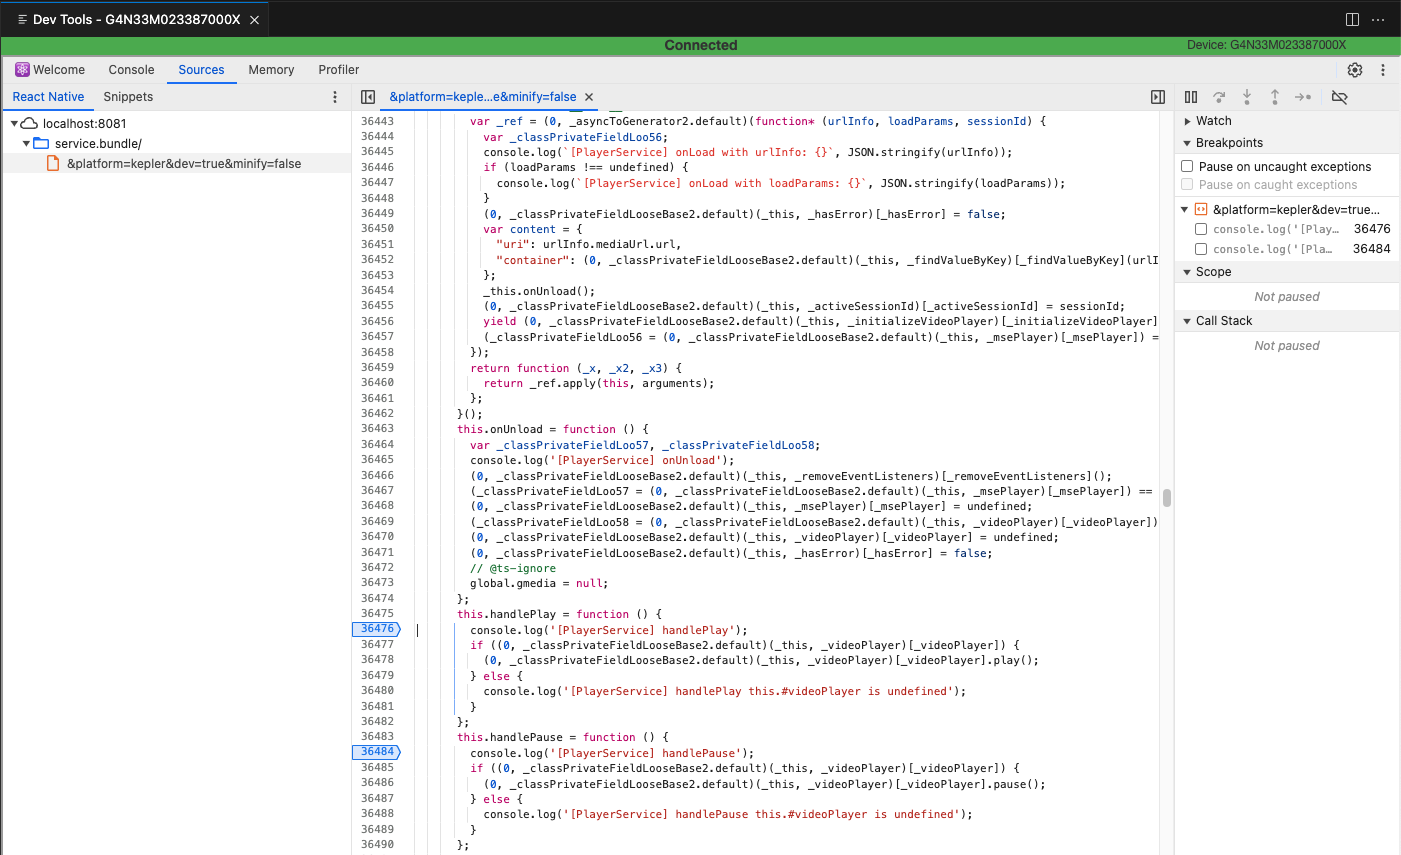
- In Vega Studio, open the Command Palette and choose “Vega: Launch Dev Tools”. Navigate to the “Sources” tab and select “React Native”.
-
Verify that the listed bundle (
index.bundle/service.bundle/task.bundle) is the one you want to debug and that its source is loaded. Note: Dev Tools will display an error about failing to load the Source Map - this can be ignored. -
To set breakpoints, search for your target code and click on the line number where you want to add the breakpoint. Note that breakpoints will only be hit for code that executes after the breakpoint is set. This means breakpoints in code that executes immediately upon launch (such as
doTaskfor headless JS tasks oronStartServicefor services) won’t be triggered. For these cases, continue using logs for debugging. - Close the Dev Tools instance and relaunch it between app launches, as Dev Tools won’t refresh automatically.
Crash Reports
Unhandled JS errors from a headless JS task or service cause the app to crash and generate an Aggregated Crash Report (ACR). Currently, this behavior only applies to release builds of headless JS tasks and services. For debug builds of headless JS tasks and services, continue to use Device Logs to detect any unhandled JS exceptions.Troubleshooting issues with headless JS tasks and services
My headless JS task/services work in debug mode but doesn’t launch or errors out in release mode
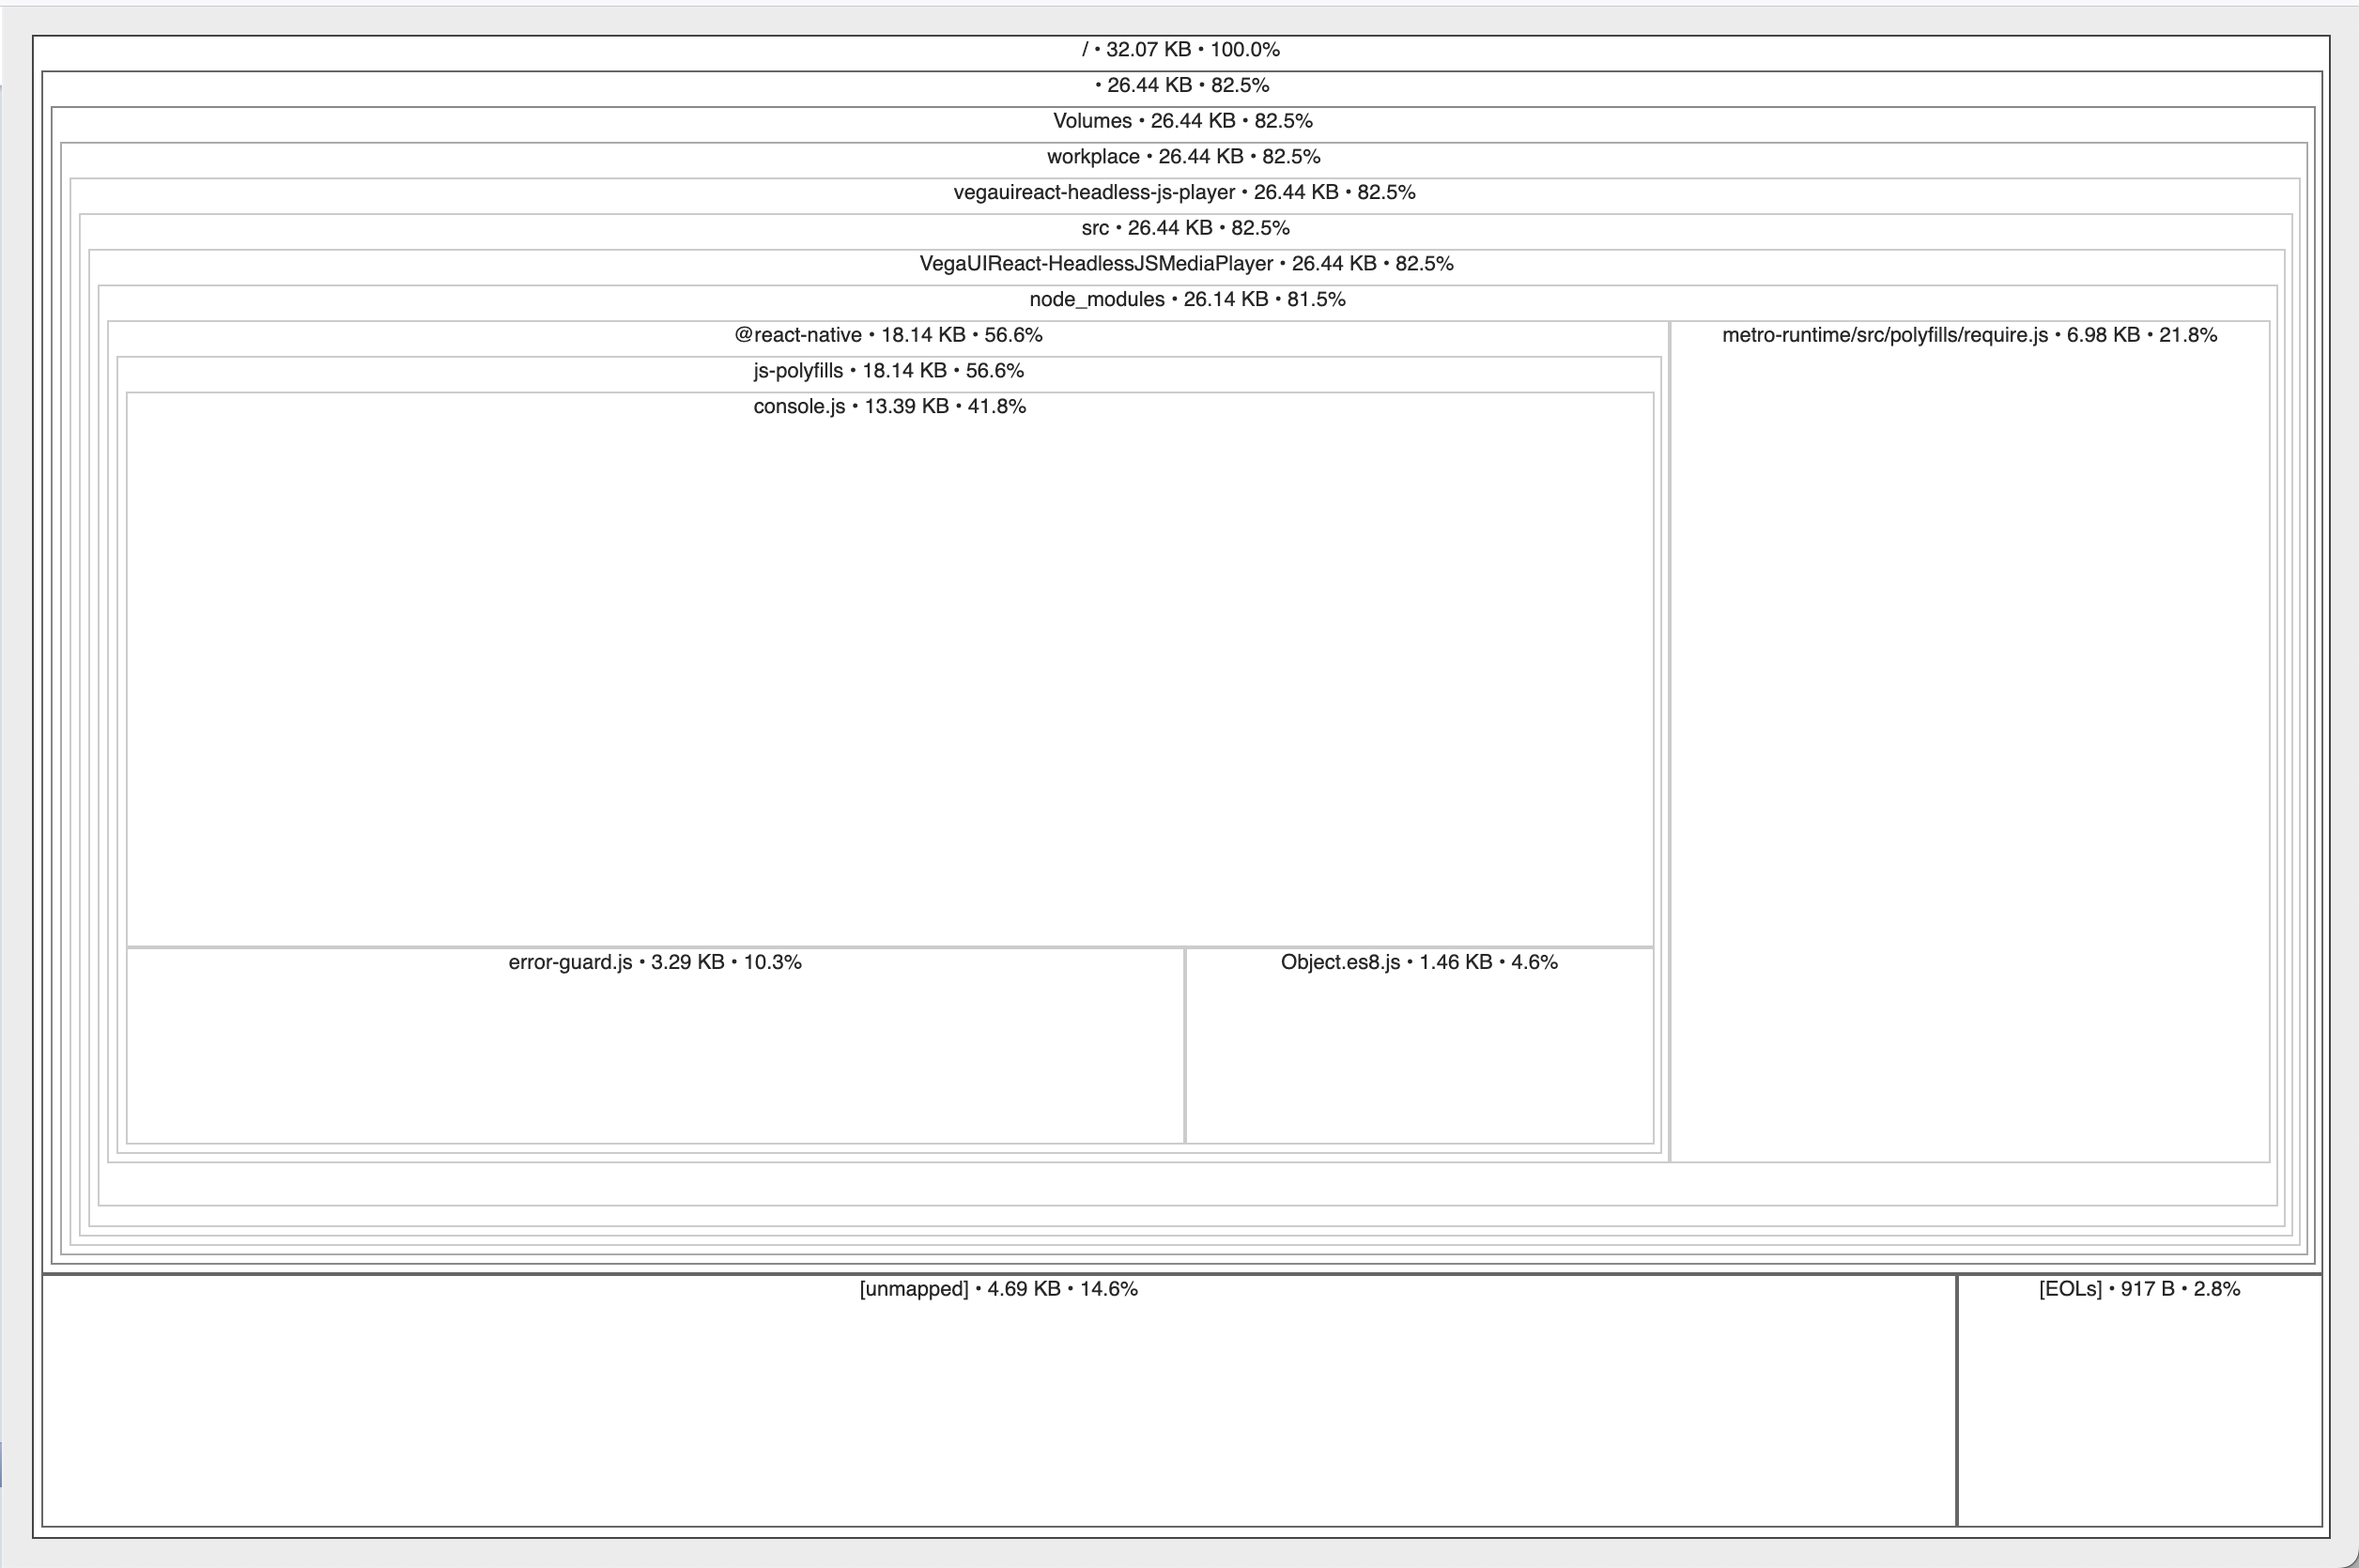
Check the logs and if you see an error like the following then your task/service bundle is trying to initialize or use a module that’s not supported in headless JS context.Step 1: Use react-native-bundle-visualizer to look at the composition of your headless JS task/service bundle
For example, compare the composition of a task.bundle when it accidentally pulls in the unsupported modules from @amazon-devices/react-native-kepler.
 Scenario 2: Wrong import
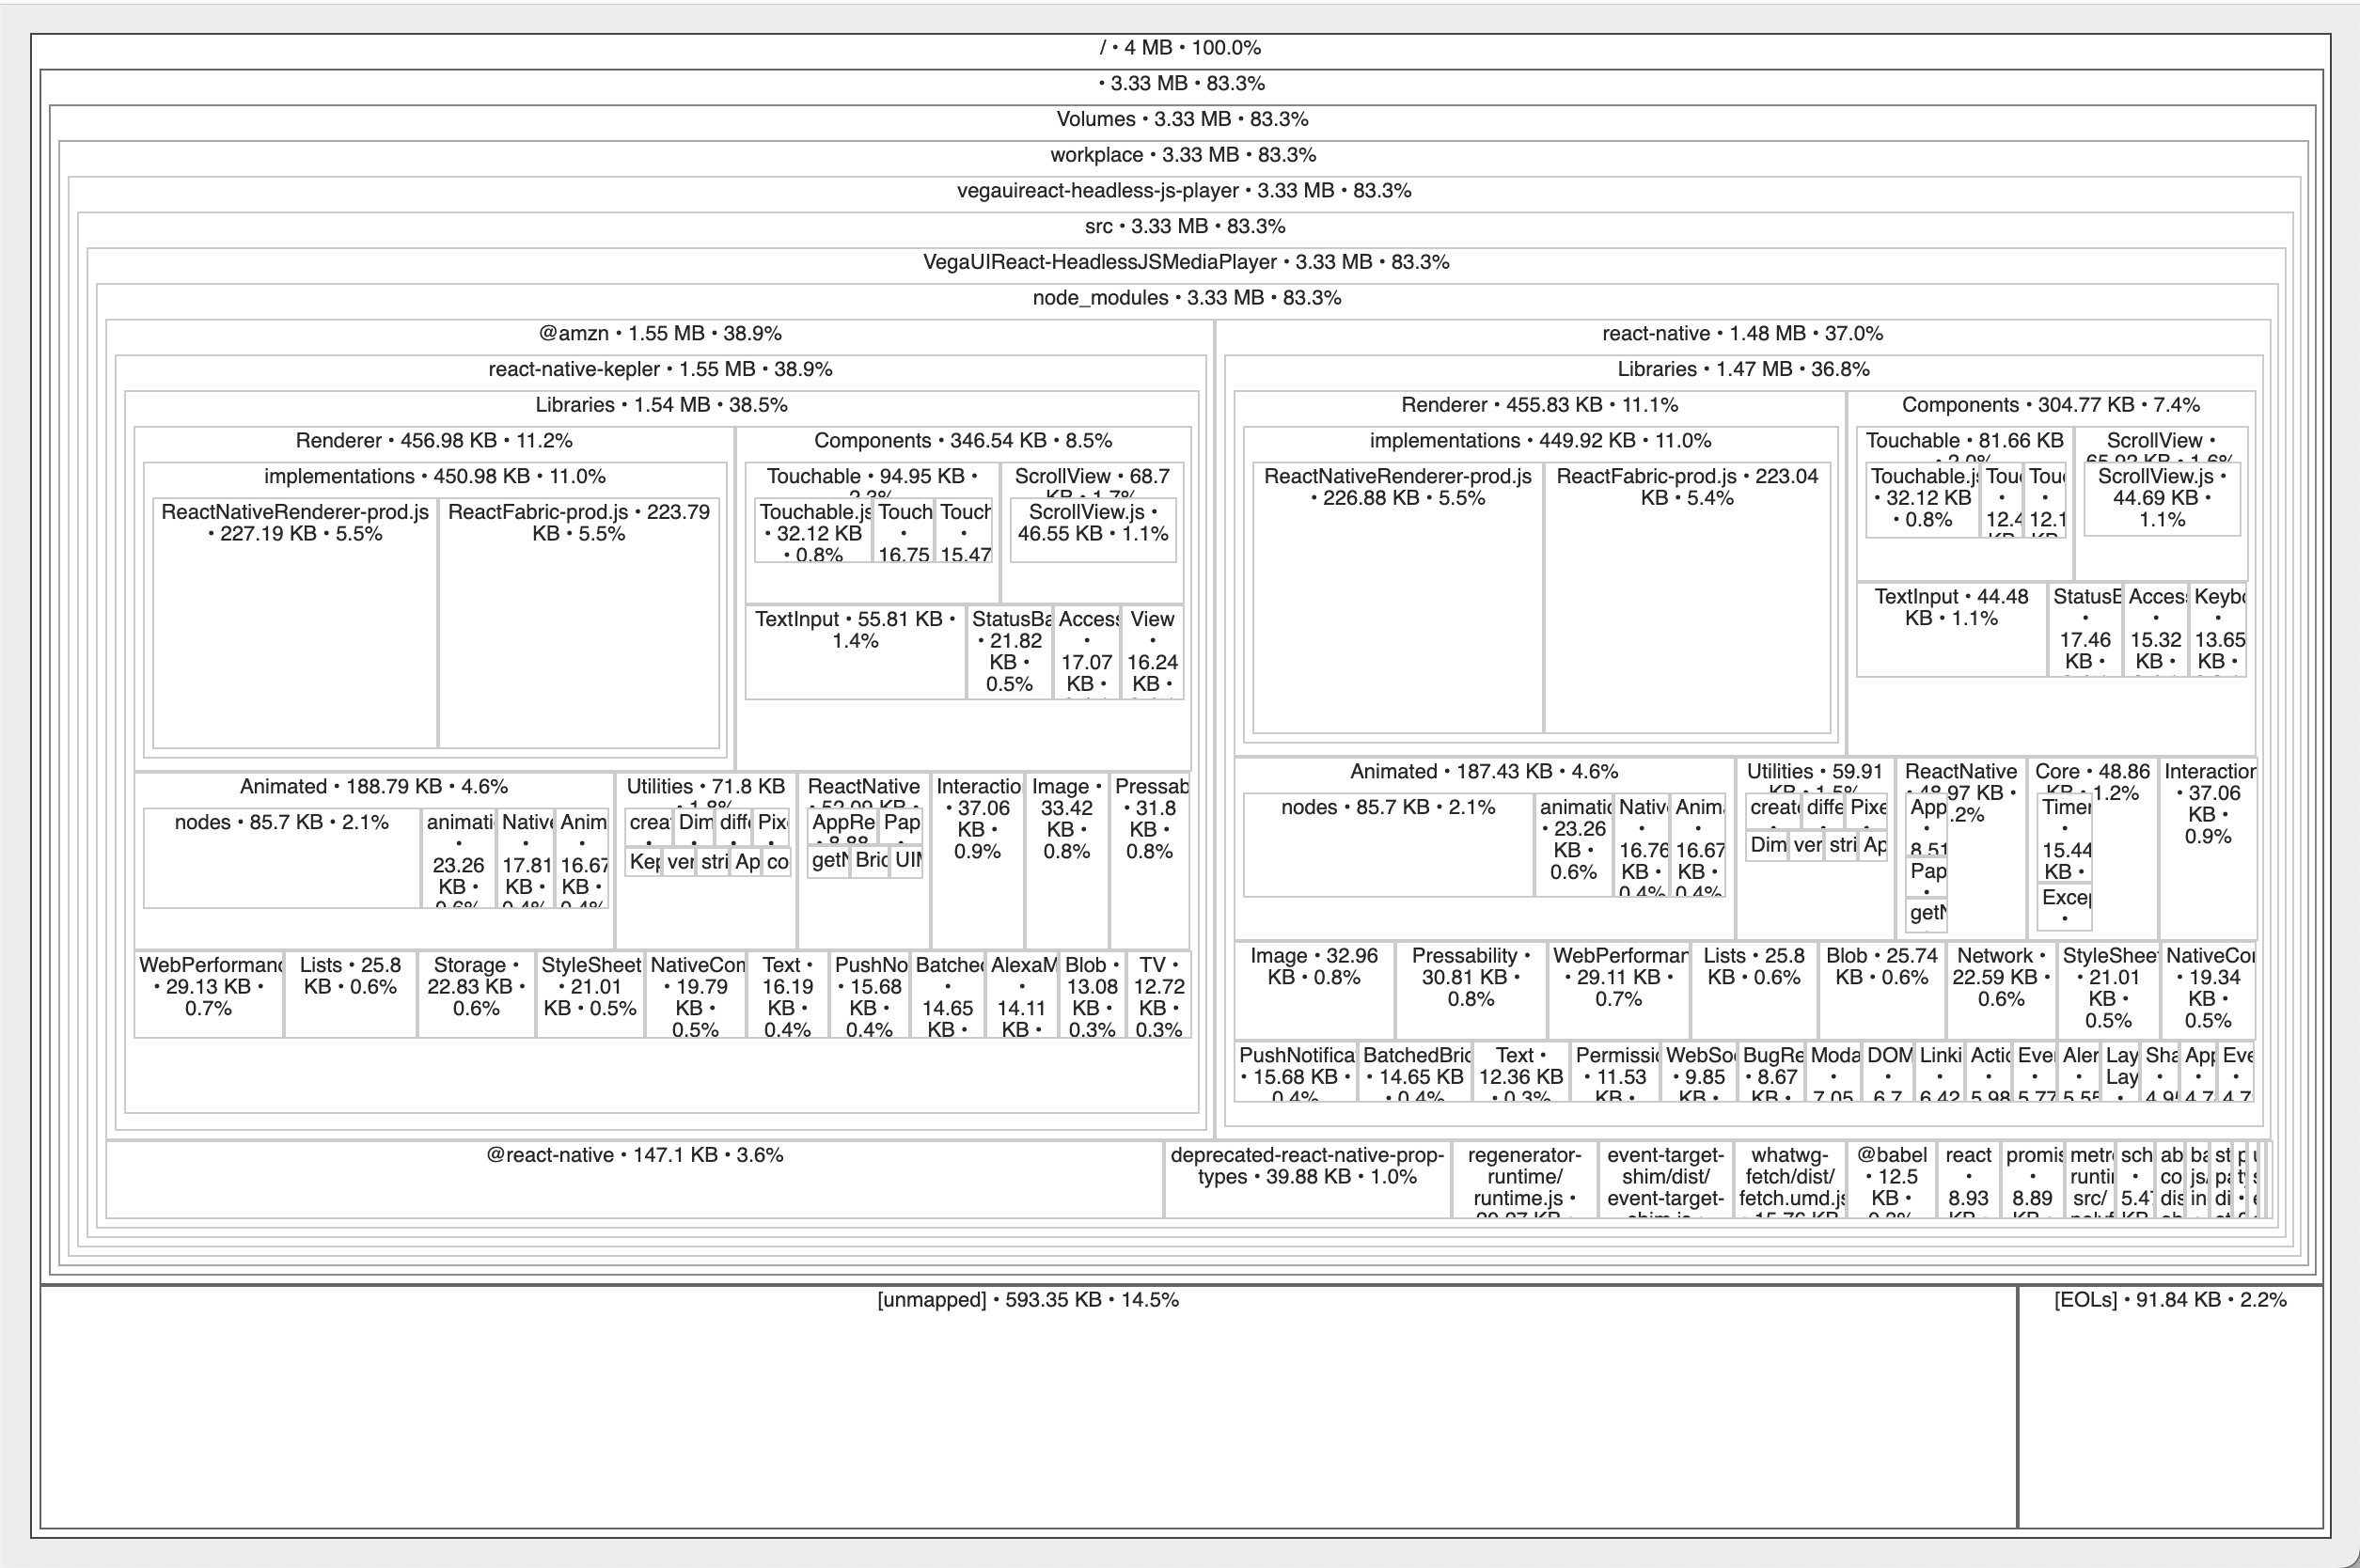 The composition of the
 task.bundle in Scenario 2 indicates that the bundle has included numerous modules from @amazon-devices/react-native-kepler, even those that are not supported in a headless JS context. Once you have confirmed that the task/service bundle includes unsupported modules, proceed to step 2 to determine who is responsible for bringing them in.
Step 2: Inspect the debug built task.bundle/service.bundle manually
Open the JS bundle (not the Hermes bytecode bundle) for the service/task (whichever is throwing error). You can typically find them inbuild/lib/rn-bundles/Debug. Let’s say it is task.bundle. You can open it using any of your favorite editors.
For example, let’s take the above task.bundle with the wrong import, and the following error:
TurboModuleRegistry.getEnforcing call that takes DeviceInfo as the input.
Once you find that, you can determine which module has this code.
For example, in above task.bundle it is:
@amazon-devices/react-native-kepler/Libraries/Utilities/NativeDeviceInfo.js.
Next step is to find out who is depending on this module. For that you can search for module ID 247 in task.bundle.
In the above task.bundle, there are two modules that depend on module ID 247:
node_modules/@amazon-devices/react-native-kepler/index.js
task.js
Step 3: Reach out to your Amazon contact
If you’ve encountered a dead end due to the absence of a suitable tool to detect unsupported modules, Amazon will be more than willing to assist you in diagnosing the issue. Please reach out to your Amazon contact for the same.Current applications of headless JS tasks and services
Headless JS tasks are employed for the following Fire TV integrations:- Electronic Program Guide
- Schedule work on app Install or Update: EPG Update, App Manifest Tasks
